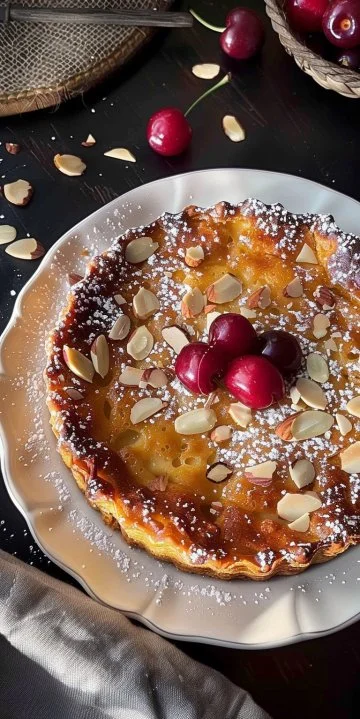

Tarta de Ricotta y Pera
Tarta de Ricotta y Pera
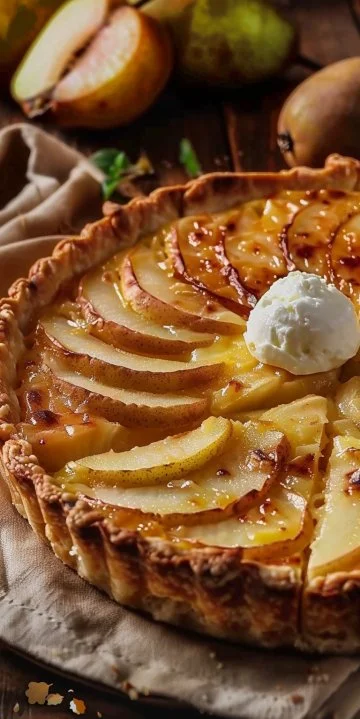
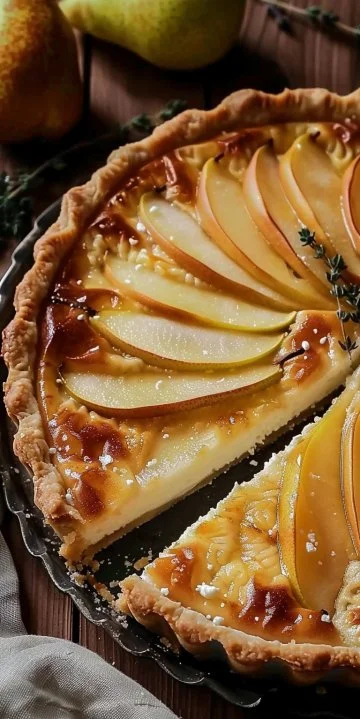
So you’re craving something tasty but too lazy to spend forever in the kitchen, huh? Same. We’ve all been there, staring blankly into the fridge, wishing for some culinary magic to happen without too much exertion on our part. Well, my friend, let me introduce you to the absolute gem that is the Tarta de Ricotta y Pera. This beauty is as creamy as a dreamy Netflix binge session and as classy as a sophisticated dinner party, but don’t let that fool you—it’s easier to make than you might think.
Why This Recipe is Awesome
Let’s be real. This tart is something special. It takes the glory of fresh pears and combines them with the dreamy goodness of ricotta. The best part? It’s idiot-proof, even I didn’t mess it up, and trust me, we’re not winning any culinary awards over here. Plus, it’s the perfect way to impress your friends or simply justify your dessert-eating habits. Who can resist a slice of this creamy goodness? Not I. Not you.
You’ll have that satisfying moment of pulling your tart out of the oven, taking a deep breath, and realizing you just whipped up something that could easily be mistaken for a fancy café treat. So whether you’re trying to wow a date or just want to treat yourself because you deserve it, this recipe is here to save the day.
Ingredients You’ll Need
Alright, gather ‘round as I list the essentials for your Tarta de Ricotta y Pera. Don’t worry, it’s not too scary:
- 170 g de mantequilla (because butter makes everything better, am I right?)
- 300 g de harina (the foundation of all great pastries)
- 100 g de azúcar (to add just the right amount of sweetness)
- 1 yema de huevo (for richness)
- 3 peras maduras (they should sound juicy and promising)
- 500 g de ricotta (the star of our show)
- 160 g de azúcar (yes, more sugar; this is a dessert after all)
- 1 huevo (because one yolk can’t do all the heavy lifting)
See? Not too complicated. Just imagine all that deliciousness coming together!
Step-by-Step Instructions
Ready to unleash your inner pastry chef? Let’s get to the fun part. Don’t worry; you’ll love how simple this is. Just follow these steps, and you’ll be golden:
-
Mezcla la mantequilla blanda con el azúcar hasta obtener una textura cremosa. This is the time to channel your inner mixologist. Get that butter creamy and fluffy.
-
Añade la yema de huevo y sigue mezclando hasta integrar bien. Keep that mixing vibe alive, ensuring that everything marries nicely.
-
Agrega la harina poco a poco, amasando suavemente hasta formar una bola homogénea. Slow and steady wins the race. You’re going for a smooth dough.
-
Envuelve la masa en plástico adherente y refrigérala durante al menos 30 minutos. Trust me, chilling is important! It helps firm up the dough so it’s easier to work with.
-
Mezcla la ricotta con el azúcar hasta que quede suave y cremosa. Think whipped clouds—that’s the consistency we’re after.
-
Añade el huevo y sigue batiendo hasta que todos los ingredientes estén bien integrados. This mix should be silky smooth and ready to wow.
-
Extiende la masa sobre un molde previamente engrasado, cubriendo el fondo y los bordes, y pincha la base con un tenedor. Get that base prepped nicely. Show it who’s boss.
-
Vierte el relleno de ricotta sobre la masa y distribúyelo uniformemente. Make sure every corner of that crust gets a taste of the ricotta goodness.
-
Corta las peras en láminas finas y colócalas decorativamente sobre la crema. Get artsy with those pear slices like you’re creating an edible masterpiece.
-
Precalienta el horno a 180°C y cubre la tarta con papel aluminio durante los primeros 30 minutos. Don’t forget this step—it’s critical for even baking.
-
Retira el aluminio y hornea durante 10 minutos adicionales. This is the moment where the magic happens. The aroma will take you places.
-
Sirve la tarta ya refrigerada y decorada con hojas de menta fresca si deseas un toque elegante. Because let’s be honest, presentation matters even in the home kitchen.
Common Mistakes to Avoid
Now, let’s chat about some classic blunders. We love a good laugh, and trust me, you’ll want to avoid these rookie mistakes:
-
Thinking you don’t need to preheat the oven. Rookie mistake. It’s like pulling a prank on your future self. No one likes a cold tart.
-
Not chilling the dough. This is not just a suggestion. It’s mandatory. Or else you’ll have a sticky mess on your hands, which is not the goal.
-
Forgetting to grease the mold. A sticky situation awaits you if you neglect this step. No one wants a cracked tart because it got glued to the pan. Just, nah.
-
Using unripe pears. Please don’t do this to yourself. If they are hard as rocks, they won’t release that lovely juicy sweetness we’re going for.
-
Skipping the mixing step. Honestly, that’s where the creamy and dreamy texture is born. Don’t shortchange yourself.
Alternatives & Substitutions
Hey, life happens, and sometimes you just don’t have all the ingredients on hand. Or maybe you want to try a little something different. Let’s explore some alternatives:
-
Butter vs Margarine: Technically you can use margarine, but why would you? Butter is the way to go for ultimate flavor.
-
Ricotta: No ricotta? No problem! Cream cheese can work in a pinch, but it will change the flavor a bit. Be aware and adjust accordingly.
-
Pears: Got apples instead? Absolutely. Use them, and you have a whole new tart—just think of it as a remix.
-
Sugar alternatives: If you are feeling healthy, consider using honey or agave for a change. Just adjust the amount, since they are sweeter than regular sugar.
FAQ (Frequently Asked Questions)
Okay, you’ve got questions, and I’ve got answers! Let’s clear some things up:
-
Can I use margarine instead of butter? Well, technically yes, but why hurt your soul like that? Live a little, my friend.
-
What if I don’t have ricotta? No biggie. Cream cheese is your friend, but don’t tell ricotta we said that.
-
How long does this tart last? If you can resist it for that long, it should keep well in the fridge for about 3-4 days. But let’s be honest, it’ll probably disappear in one sitting.
-
Can I freeze it? Totally! Just slice it first. Wrap each slice separately, so you can indulge whenever you please.
-
What other fruit can I use? The world is your fruit basket. Peaches, berries, or even plums would shine in this tart.
-
Why is my dough crumbly? Did you measure correctly? A little extra butter can help if you think it’s too dry.
-
Can I eat it warm? Sure, but give it some time to cool. Warm ricotta is lovely, but it can also be messy.
Final Thoughts
And there you have it, folks! Your very own Tarta de Ricotta y Pera, ready to dazzle and delight. Now go impress someone—or just yourself—with your new culinary skills. You’ve earned it, my friend. Bake that tart and bask in the applause (even if it’s just you applauding because you deserve it). Happy baking!
Print
Tarta de Ricotta y Pera
- Total Time: 70 minutes
- Yield: 8 servings 1x
- Diet: Vegetarian
Description
A creamy and elegant tart combining fresh pears and ricotta, perfect for impressing guests or indulging in a special dessert.
Ingredients
- 170 g de mantequilla
- 300 g de harina
- 100 g de azúcar
- 1 yema de huevo
- 3 peras maduras
- 500 g de ricotta
- 160 g de azúcar
- 1 huevo
Instructions
- Mezcla la mantequilla blanda con el azúcar hasta obtener una textura cremosa.
- Añade la yema de huevo y sigue mezclando hasta integrar bien.
- Agrega la harina poco a poco, amasando suavemente hasta formar una bola homogénea.
- Envuelve la masa en plástico adherente y refrigérala durante al menos 30 minutos.
- Mezcla la ricotta con el azúcar hasta que quede suave y cremosa.
- Añade el huevo y sigue batiendo hasta que todos los ingredientes estén bien integrados.
- Extiende la masa sobre un molde previamente engrasado y pincha la base con un tenedor.
- Vierte el relleno de ricotta sobre la masa y distribúyelo uniformemente.
- Corta las peras en láminas finas y colócalas decorativamente sobre la crema.
- Precalienta el horno a 180°C y cubre la tarta con papel aluminio durante los primeros 30 minutos.
- Retira el aluminio y hornea durante 10 minutos adicionales.
- Sirve la tarta ya refrigerada y decorada con hojas de menta fresca si deseas un toque elegante.
Notes
Ensure the pears are ripe for optimal sweetness, and don’t forget to chill the dough.
- Prep Time: 30 minutes
- Cook Time: 40 minutes
- Category: Dessert
- Method: Baking
- Cuisine: Italian
Nutrition
- Serving Size: 1 slice
- Calories: 350
- Sugar: 20g
- Sodium: 200mg
- Fat: 18g
- Saturated Fat: 10g
- Unsaturated Fat: 8g
- Trans Fat: 0g
- Carbohydrates: 45g
- Fiber: 2g
- Protein: 6g
- Cholesterol: 100mg
Keywords: tarta, ricotta, pera, postre, italiano, fácil